Monday, October 11, 2010

18" Doll: Bedside Lamp


Yes....It REALLY lights up!!!!

This is a fun little project that re-uses simple items.  You may even have some (or all) of these items at home already!  


SHOPPING LIST:

4 - bendable drinking straws
1 - empty plastic bottle (like for vitamins)
1 - clear plastic drinking cup
1 - LED battery powered tea light (sell at craft stores in candle section - $1?)
scrap of paper (to decoupage onto bottle)
light-weight scraps of tissue paper (I used pieces of paper from a pattern I was cutting out)

decoupage glue
hot glue gun
white rice, pebbles, or even sand (something to add weight to the bottle)


INSTRUCTIONS:

1.    Cut out a strip of paper that will fit around your selected bottle:
(I'm sorry I can't specify a size to cut....it all depends on the size and diameter of the bottle you choose.)
Glue the strip of paper to your bottle using decoupage, and let dry.


2.    Meanwhile, cut off the rim of your plastic cup so that it is more to scale for your lamp:
(If your bottle is LARGE, you may not need to cut the cup, or if your bottle is smaller, you could use a smaller DIXIE cup to get the scale correct.  Just play with it until the "scale" looks right next to your doll.)


3.    Cut your tissue paper into small random pieces, about 1"x1".  You will need enough to cover the surface of your plastic cup.


4.    Glue your pieces onto your plastic cup with decoupage medium.  I placed them randomly, making sure to cover all of the cup from top edge to bottom edge.  I may take 2-3 "layers" of paper to get it covered and looking right.  Let the cup dry.


5.    When your bottle is dry, fill it with something to give it weight (rice, sand, pebbles, etc.):


 6.    "Tamp" the bottle on the counter or a table to make the contents settle in the bottle, and then top it off with your "weighted material" to the brim of the bottle:


7.    Have the bottle cap ready to put onto the bottle.  Add hot glue around the rim of the bottle, through the threads, and then quickly screw on the bottle cap.  Let the hot glue dry.


8.    Take 2 straws.  Insert one short end into the other straw (short end), creating a U shape.  Repeat with the other set of straws.

9.    Arrange the straws on top of the bottle cap (as shown) perpendicular to the other set of straws.  (You will hot glue one set onto the bottle cap, and then spin the bottle 90 degrees and hot glue on the other set of straws so that they sit in a "box" shape on the bottle cap.  Add enough hot glue to hold them down well, and to make the surface more "level" for the next step.


 10.    Once the hot glue is DRY, place the LED tea light onto the bottle cap.  (This LED tea light IS NOT GLUED DOWN so that you can turn it on and off or replace the battery.)


11.    Once DRY, place the lamp shade (plastic cup) over the straw armature.  You will likely need to cut the straws shorter to make the lamp shade sit at the right height over the LED tea light.  (THE LAMP SHADE IS NOT GLUED ON so that you can remove it to get to the LED tea light.)


12.    Your lamp is finished!

***** Want a LARGER LAMP???  Use a larger bottle!  It would be a better size for the "living room"!****
My 3 year old daughter is IN LOVE with this lamp!  It is simple enough for her to turn on and off, and sturdy enough for her to play with.  I think kids of all ages would love to have this....even me! :)


Please feel free to use these plans to build furniture, for sale or for pleasure, but please do not sell the PLANS as your "own".  Please also give credit to me and link back here!  I hope you enjoy them!!

***I am NOT LIABLE for any plans featured here. Please take every precaution and use your own discretion to make sure these toys are safe for children to play with them.

18" Doll: Nightstand or Small Bookshelf


This is a SIMPLE plan, and goes together in minutes:

SHOPPING LIST:

1x4:    1@ 8" long (top of nightstand)
1x4:    2@10" long (sides of nightstand)
1x4:    2@ 6" long (shelves)
MDF:  7" wide x 10.5" high (back of piece)

2" nails/nail gun
wood putty to fill holes and knots
paint or stain to finish piece

INSTRUCTIONS:

1.    Mark your measurements onto your wood and cut out pieces.

2.    Sand all wood well so that the edges go together snugly.

3.    Lay 2 10" side pieces down flat, side by side and squared off with each other, so that you can mark where the shelves will be nailed:
The bottom shelf is located 2" from the bottom of the sides, and the top shelf is located 6.75" from the bottom of the sides.  (These measurements are to the BOTTOM side of each shelf.)

4.    Nail the sides into the shelves to create a "ladder" shape:


5.    Attach the 1x4x8 to the top of the shelf, being certain that you have oriented the shelf in the "upright" position first.

6.    Nail the MDF backing on the the back of the piece, being sure to square the edges and make sure they are flush with the sides (my piece is a little small because I used scrap.)

7.  Fill all nail holes and knots in wood with wood putty.

8.  Sand piece well.

9.  Finish as desired with paint or stain.


Please feel free to use these plans to build furniture, for sale or for pleasure, but please do not sell the PLANS as your "own".  Please also give credit to me and link back here!  I hope you enjoy them!!
***I am NOT LIABLE for any plans featured here. Please take every precaution and use your own discretion to make sure these toys are safe for children to play with them.

Baby Doll Changing Table OR Bunk Bed for 18" Dolls

So.....we needed a baby doll changing table.  I think this is the best plan I could come up with, because it also doubles as a BUNK BED for your 18" dolls!!!!!


SHOPPING LIST: (You may have some of these pieces on-hand as SCRAP)

2x2:    4 - 18" long (legs)
1x4:    2 - 24" long (top sides of "tray")
1x4:    2 - 10.25" long (top ends of "tray")
1x2:    2 - 24" long (sides of bottom "shelf")
1x2:    2 - 10.25" long (ends of bottom "shelf")
MDF:  2 - 12"wide x 24"long (top "tray" bottom and bottom "shelf")

12 - 2" wood screws
countersink bit for the screws
2" nails (nail gun)
1" nails (nail gun) - for tacking on the bottom MDF shelf
wood putty to fill holes and knots
Paint or stain to finish your piece


INSTRUCTIONS:

1.    Mark your sizes on your wood and cut out your pieces.  (I always mark the wood with sizes AND where it is to be used (leg, side) so that I can move faster when building.

2.    Sand your pieces (on the ends to be joined, at least, if not completely).  You don't want to deal with edges that won't join cleanly and snugly.

3.    Pre-drill 2 holes in the TOP of each 2x2 leg, with 2 legs having the "holes" toward the left side (as pictured) and 2 legs having the "holes" toward the right side.  This allows the legs to be mounted flush against the 1x4x24" side rails.  (The 2x2 is pictured being pre-drilled, and the 1x4 is positioned vertically underneath it for "measuring".  Thanks to my husband for doing this for me - his hands are bigger!)

Your 2x2 holes should look like this:

(these are the holes that are pre-drilled toward the right side....)

(this picture shows the holes oriented to the left for left side and to the right for the right side:)

4.    After pre-drilling the 2x2's, screw them into the 1x4x24" side rails:
(Yes, this picture is of a later step, but I wanted you to see the side profile of 2x2's and side rail:)

5.    You should now have a "pair" of side rails, one set for each side.

6.    Next, nail your 1x4x10.25" ends between the pairs of side rails to complete the "tray".  You will be using 2" nails to nail from inside the tray, through the 1x4x10.25" into the 2x2 legs.  Nail 4-5 times, spacing as you go along.
(Once again, picture is of a later step...)

7.    You should now have a "tray" on legs!

8.    Turn the piece upside-down, so that it is resting on its tray top.  Place one of the MDF 12x24 pieces between the legs, center it so that it is flush on the side and end rails, and nail down into the 1x4 rails using 1" nails every 2 inches.  (You may use screws instead of nails for added stability.)  

9.    Now turn the piece on its side.  You need to mark each 2x2 leg (on the inside) at 2" from the bottom of the 2x2 leg.  This is so that the 1x2 side rails will have a line you can use to keep them square as you build.  Position the 1x2x24" between the 2x2 legs, and square with the line on each leg (the line is positioned at the bottom of the 1x2, to give you a 2" clearance underneath the piece.)

10.    Pre-drill the hole, and then drill through the 2x2 leg into the 1x2x24" rail, making sure to keep the rail square to the line you marked on the inside of the leg.  (This picture is looking DOWN onto the leg after it was drilled.)  Do this step to both sides of the piece.

11.    Now nail on the short 1x2x10.25" ends.  Nail down (as pictured) through the 1x2 into the 2x2 legs.  Do this step for each end of piece.

12.    Turn your piece right-side-up.  It should now look like this:

13.    Last, place the other piece of 12x24 MDF on top of the bottom shelf.  Make sure edges are flush with the sides and ends of the 1x2's, and then nail or screw through the MDF into the 1x2's, spacing about 2" apart.

14.  Fill all nail holes and knots in wood with wood putty.

15.  Sand piece well.

16.  Finish as desired with paint or stain.

(I have not filled my nail/screw holes or painted this piece yet....in an effort to get the plans out to you so that you may build this in time for Christmas!  Please forgive the lack of "finish"!)

17.  So this can be a changing table for your child's baby doll:

And when they outgrow baby dolls...it can easily be converted to a bunk bed for their 18" dolls:

You simply need to add a "mattress" to the top for a baby changing table, and another mattress to the bottom for a bunk bed!  ****Instructions to make mattresses and pillows are located in my doll bed posting....please adjust the sizes according to the width and length of the piece here.  Or, you could just shove a pillow into the top like I did for the photo shoot! :)

You can see the bunk bed as built by reader's here:

Please feel free to use these plans to build furniture, for sale or for pleasure, but please do not sell the PLANS as your "own".  Please also give credit to me and link back here!  I hope you enjoy them!!
***I am NOT LIABLE for any plans featured here. Please take every precaution and use your own discretion to make sure these toys are safe for children to play with them.

Sunday, September 19, 2010

Pretend Play: Wooden "Gas Pump"

I want to thank Ana White at http://ana-white.com/ ......if it weren't for you, Ana, I would never have been brave enough to try this on my own, or to have the skills (which you taught me!) to complete it!!! My daughter and I THANK YOU!!!

I have had this half-made for months! I finally got serious yesterday and finished the gas pump. I realized that I made this from entirely salvaged parts and scrap wood...so it was FREE! As soon as it was dry, my daughter HAD to play with it....

I started with a simple "box" out of 1x10's (sides, top, bottom) and then added a 1x4 stile to the top and a 1x3 stile to the bottom. I then glued and nailed a piece of MDF inside the box to create the "face" of the gas pump:
**The "key pad" is a Gerber (plastic) food lid painted black and an old cell phone key pad glued to the top. ***UPDATE: I originally used hot glue to adhere the cell phone pad to the plastic Gerber lid, but within 2 days my daughter had pulled it off.  I had read great reviews on GORILLA GLUE, so I purchased some and used that to glue the cellphone pad onto the plastic lid.  THIS WORKED GREAT! It is VERY solidly "on there".  (I have not been paid or given free product.  This is simply my opinion.)
**The "gas selection" buttons, "readout screen", "attendant speaker" and "card reader" are all pieces of hobby wood.
**The CHEVRON logo is printed from Google images and decoupaged onto the front.
**I used Behr Polar Bear in Semi Gloss to paint the piece, although I wish I could have used silver and black!

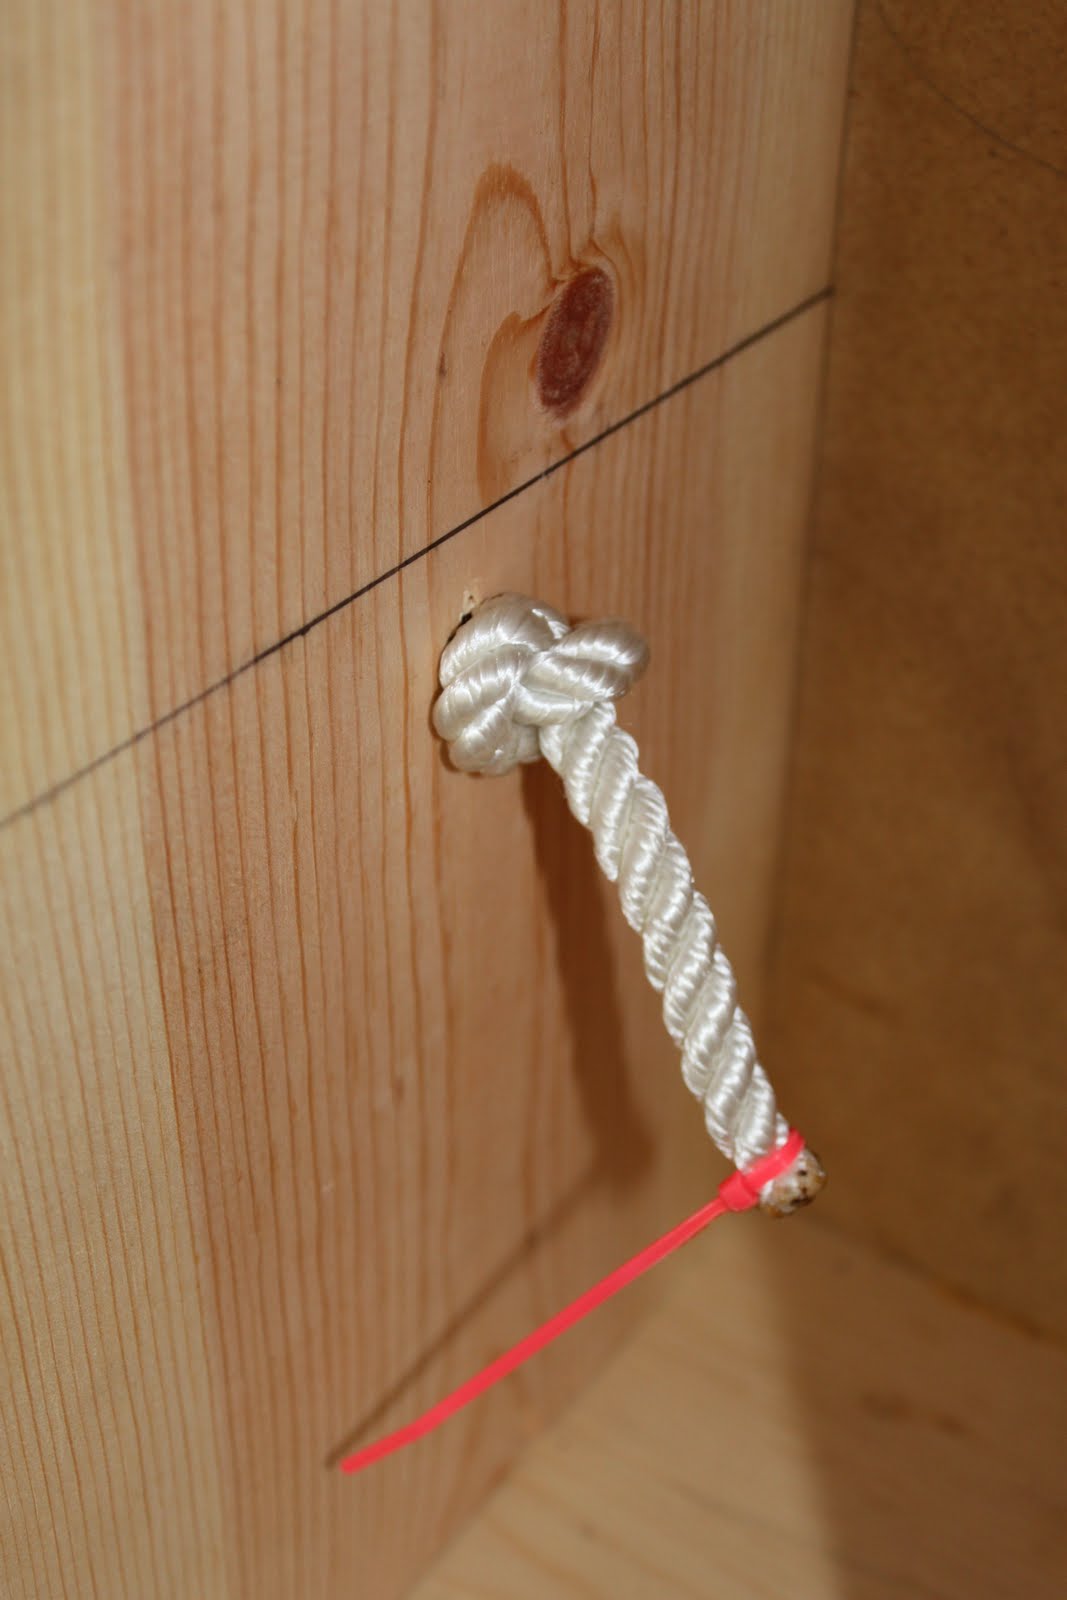
After painting the piece, I mounted a 45 degree ABS elbow (2"? pipe) to the side of the gas pump for the pump nozzle to rest inside of. I then placed the gas pump nozzle into the elbow (to estimate placement of hole), and then drilled a hole for the "hose" (rope) to go. (I covered the hole with a bottle cap that I hot glued in place to make it look nicer, and fed the rope through to the inside. I then knotted the rope, and sealed the end with a zip tie and blow torch to prevent fraying:


I made the pump nozzle from some "old contractor parts" my husband had in the garage: electrical 45 degree PVC sweep (the "nozzle end") and an electrical 90 degree pull box (the "handle end"):


Now we're ready to swipe the debit card....

punch in our PIN number.....

and "fill 'er up"!

Happy Building!!

Please feel free to use these plans to build furniture, for sale or for pleasure, but please do not sell the PLANS as your "own".  Please also give credit to me and link back here!  I hope you enjoy them!!

***I am NOT LIABLE for any plans featured here. Please take every precaution and use your own discretion to make sure these toys are safe for children to play with them.

Friday, September 10, 2010

Baby Doll: Bassinets

I've decided to go through my craft stash....and make Christmas presents for the kids. I never knew I had SO MUCH fabric, or so many unfinished (READ: half-way done and I gave up or got side-tracked) projects!

I have a 2 year old niece who is fascinated with baby dolls and pretending to be "mommy". She's a girlie-girl. I searched the internet and was introduced to TWELVE CRAFTS TILL CHRISTMAS, and her doll bassinet tutorial! Brilliant idea for me to use!


***I will allow her to tell you how to do it...can't improve upon perfection.

Here's the finished product for my niece (using my stashes of fabric, lace and quilt batting):

And, of course, why make 1 when you can make 2 just as easily!! So....here is one for my daughter:

And then.....my daughter found them. SO EXCITED! She said "not Cwis-mus, mommy", and that was that. We took the other bassinet to my niece (didn't want them arguing over the same bassinet while we visited), so I guess I'll have to make something else for Christmas. :)

***I am NOT LIABLE for any plans featured here. Please take every precaution and use your own discretion to make sure these toys are safe for children to play with them.

Pretend Play: "Doctor" Lab Coat

My daughter is fascinated with all things "medical" because we have some doctors in the family. She is always trying to "doctor" us, so I decided she needed a lab coat to go with her doctor bag:


I simply purchased a white collared button-down long-sleeved shirt for $2 from Goodwill. After a GOOD washing in some bleach and ironing after drying, I measured my daughter's arm length from her collar bone to her wrist and added an inch for hems. I transferred the measurement to the shirt sleeves, lopped them off at the mark, and hemmed them.

Then I used the left over sleeves to make 2 pockets for the front (bottom) of the lab coat. I pinned and hemmed the pockets first, then pinned and sewed them to the shirt, leaving the top of the pocket open (duh!). I then added large buttons down the front (for affect) and velcro to the inside placket (for ease of child play). A plastic name tag (on-hand) completes the look. Can't beat $2!

***I am NOT LIABLE for any plans featured here. Please take every precaution and use your own discretion to make sure these toys are safe for children to play with them.