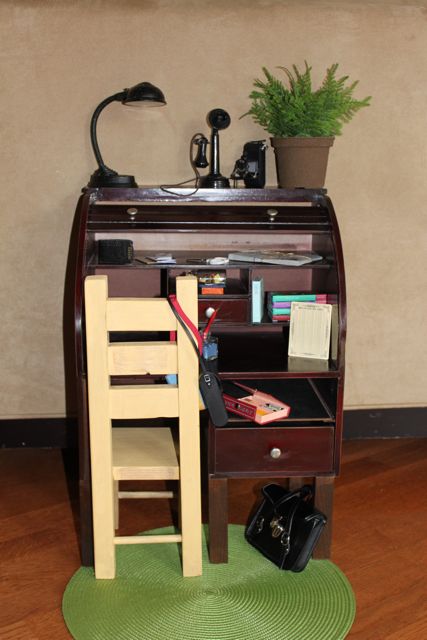
Friday, July 29, 2011

18" Doll: Dining or Desk Chair

Today we are going to work on a chair - for your doll desk, dining table or just "for the corner"!

SHOPPING LIST: (You may have some of these pieces on-hand as SCRAP)

2 - 1x1@ 16" (for back legs of the chair)
2 - 1x1@ 5.25" (for the front legs of the chair)
1 - 1x6@ 5.5" (for chair seat)
3 - 1x2@ 3.25" (for the back rungs of the chair)
2 - 3/8" round dowel @ 4.25" (for front/back foot rungs of chair)**
2 - 3/8" round dowel @ 5" (for 2 side foot rungs of chair)**
     **these are cut 1/2" longer on both sides because you will drill a 1/2" hole into each leg in which to glue these for stability

Drill / small drill bit (to bore out 3/8" dowel hole) / countersink bit
square
tape measure / pencil / level
small hand saw
adjustable clamps
120 Grit sand paper
wood putty to fill holes and knots
Paint or stain to finish your piece (if desired)

INSTRUCTIONS:

1.  Cut out all of your pieces of wood to the sizes specified in the shopping list.

2.  We will be making measurements on your four cut legs for placement of your round dowel rungs.

3.  Line up your 2 front legs (5.25" pieces) so that they are laying flush against each other, and even on both ends (you want your markings and eventual holes to be even so that the dowels are glued in evenly).  Measure up from the bottom of the legs and mark at 2" on center (this will be the hole for the INSIDE FRONT legs):


4.  Now.... rotate the legs INWARD so that the 2" marks you just made are facing each other on the INSIDE:

5.  The front legs should now look like this (with the 2" marks facing each other on the inside): 

6.  Measure up from the bottom and mark at 3" on center:

7.  You should now be able to slightly rotate your legs OUTWARD and they should look like this if the markings are correct:

8.  Now line up your two back legs (16") so that they are laying flush next to each other and are even at both ends.

9.  Measure up from the bottom 3" and mark (on center):

10.  This time...rotate your legs so that the marks you just made face OUTWARD:

11.  Here are the 16" legs with the 3" markings facing outward:

12.  Now....on the top of the legs....measure up from the bottom 2" and mark (on center):

13.  Your 16" legs should now look like this:

14.  Next...I took my 3/8" drill bit, measured 1/2" up from the tip, and "taped" the 1/2" mark to use as a guide for how far to drill down into the wood:


15.  Okay....now you will need to have a bit of PATIENCE and drill SLOWLY so your holes are the right depth (don't ask me how I know....).  On each of the 2" and 3" marks that you made on the 2 sets of legs, CAREFULLY drill them out to 1/2" deep, being cautious to keep the holes PERPENDICULAR to the wood so that your dowels won't look "wonky":


16.  Carefully sand your legs, being sure that all "burrs" from the drilled holes are gone (you want the dowel rungs to fit into the holes cleanly and snugly):


17.  I then stood my legs UP to see where the seat would rest on the front legs and therefore mark the  meet up point with the back legs, like this:

18.  I then screwed on the right front leg (chair front facing left), being sure to pre-drill the hole with a counter-sink bit, and also making sure that the 2" dowel hole faced INWARD and the 3" dowel hole faced BACKWARD toward the back legs:

19.  Now, position your left front chair leg and pre-drill the hole down through the chair seat.  Then add glue into the two front legs (2" dowel holes), add the dowel between them, and then quickly screw on the left front chair leg (wipe up ALL glue spills):

20.  Now that your front legs are attached to your seat, position them against your "standing" back legs again, being sure that your 3" markings on your back legs are pointed TOWARD the front legs, and the 2" markings are pointed INWARD toward each other! (Your mark may have changed on where to screw your seat to the back legs).  Use a level to get the seat correctly positioned, and then mark your legs (as shown below) with a pencil where the top of the seat meets the back leg WHEN LEVEL:

21.  Now you can lay your back legs down, and then place your seat onto the level upper mark.  Add a mark underneath the seat (as shown below) so that you can be sure your seat stays on it's level mark from all angles as you work:

22.  Now that you have marked the "thickness" of your seat onto the back legs, you can pre-drill the holes.  Start first from the inside where you made the mark, and then pre-drill that same hole again from the outside (back) of the legs:

23.  DO NOT ADD GLUE to your 2" dowel holes on each back leg!! Just add the dowel between the 2 holes and sandwich them together snugly (you will need this dowel to "move" later while assembling):

24.  Now you can drill your back legs to your seat, ONE AT A TIME, because you need to ADD GLUE and DOWELS to your 3" leg marks as you go:


25.  Here you can see how I have "twisted" the back leg BACKWARDS to be able to get that last dowel into place (this is why you don't glue the back 2" high dowel...it needs to move):
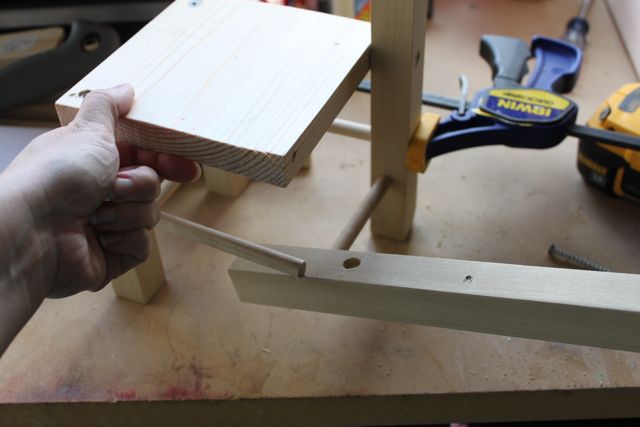
26.  Now that all dowels are in place, you can use some clamps to secure them tightly until that glue dries!  (Be sure to clean up ALL GLUE SPILLS after clamping.):

27.  Position your 1x2 back rungs between your two back legs and screw from either side.  My top rung is positioned 1" from the top of the back legs, and then 3/4" between them (I added a third rung after this picture...):

28.  Fill all your holes with wood putty and let dry overnight.  Sand well!!  Finish as desired.
Please feel free to use these plans to build furniture, for sale or for pleasure, but please do not sell the PLANS as your "own".  Please also give credit to me and link back here!  I hope you enjoy them!!

***I am NOT LIABLE for any plans featured here. Please take every precaution and use your own discretion to make sure these toys are safe for children to play with them.

Friday, June 17, 2011

18" Doll: RECYCLE - Roll Top Desk

One day....
while I was shopping at Goodwill....
I looked over and saw a desk top organizer
I realized that this would make a PERFECT "desk" for the dolls....
with a bit of "tweaking" first!
The best part....it was only $7.99!!!
 It was missing a chunk out of the side, one of the drawers was DESTROYED, and it was DUSTY, but it had lots of potential!

I LOVE the desk that American Girl sells, 
but I can't afford that kind of money for a toy.
If you are interested, though, you can find that desk here:

Here's how it did it:

1.  I took out the broken drawer, and trashed everything except for the drawer bottom, which I glued back into the empty "drawer space" to act as a shelf.  I filled the missing "chunk" on the side with wood putty, and then let dry.  (Later this was sanded smooth and colored with the same stain used on the legs.)

2.  I then turned the desk onto its back.  I wanted to remove the vertical "files" on the bottom left corner to create room for a chair to sit.  I carefully sawed down the left side of the drawer bank towards the back of the desk (desk front is pointing "up" in photo).

 3.  I then used a hammer to gently "tap" out the bottom piece that I had cut away (I could tell that the bottom piece was only "glued" on the left and at the back).

 4.  Here is what it looks like with the bottom piece cut and then "tapped" off:

5.  I removed the vertical dividers, and sanded the raw edges where the bottom came off.  I also sanded all of the exposed edges of the desk to give it a more "antique" and worn look.

6.  I'd love to show you pictures of the "legs" being added....
but either it was operator error OR my camera "ate" those pics!!
I used 1" square dowels (4 total) for the legs on the right side under the drawers (5" tall),
and I used .5" square dowels (2 total) for the legs to the left where the chair sits (these measure 10.75" tall).  I spent about 2 weeks on the legs just sanding, gluing, and clamping each one in turn (I only have one set of jumbo clamps)!
7.  I then stained the legs to match the desk.  Once the stain is dry (give it a good week!), you can accessorize!  Enjoy!

The desk measures: 13.5" wide x 10" deep x 20" high
 
Here's the desk with a My Twinn doll featured next to it:

 American Girl doll (sitting, left) and My Twinn doll (standing, right):

Please feel free to use these plans to build furniture, for sale or for pleasure, but please do not sell the PLANS as your "own".  Please also give credit to me and link back here!  I hope you enjoy them!!

***I am NOT LIABLE for any plans featured here. Please take every precaution and use your own discretion to make sure these toys are safe for children to play with them.

Thursday, June 16, 2011

18" Doll: Ana White - Ayla Cabinet

Ana White has posted FREE PLANS to build
 a GORGEOUS little storage cabinet
for 18" dolls.

Head over and check it out:

While this is not large enough to store "doll furniture" inside, it would do nicely for hanging doll clothes and a doll or two inside the cabinet.  The drawer is perfect for shoes, folded clothes, and small doll accessories!  There's even room on top for displaying some larger pieces (furniture) and "nice" dolls on display stands.  Overall, this is a great piece for a small area (think bedroom, entry way, or even an apartment) or for a little girl just starting out with her "doll world"!

Looks like fun! :)

Please feel free to use these plans to build furniture, for sale or for pleasure, but please do not sell the PLANS as your "own".  Please also give credit to me and link back here!  I hope you enjoy them!!

***I am NOT LIABLE for any plans featured here. Please take every precaution and use your own discretion to make sure these toys are safe for children to play with them.

18" Doll: Spilled Milk

Everyone needs

a glass of 

SPILLED MILK!
This is a cute tutorial on how to make
your own "glass of spilled milk"....
just use a smaller "glass" sized for 18" dolls!

Having a hard time finding a glass???
Try looking for glass votive candle holders or
clear plastic caps from plastic bottles (like hairspray).

FUN!


Please feel free to use these plans to build furniture, for sale or for pleasure, but please do not sell the PLANS as your "own".  Please also give credit to me and link back here!  I hope you enjoy them!!


***I am NOT LIABLE for any plans featured here. Please take every precaution and use your own discretion to make sure these toys are safe for children to play with them.

18" Doll: Mini Picture Frames

Need some mini picture frames
for your "doll world"???

Head over to Dollar Store Crafts for a simple and fun tutorial
by Care at Obsessively Stitching.


ENJOY!


Please feel free to use these plans to build furniture, for sale or for pleasure, but please do not sell the PLANS as your "own".  Please also give credit to me and link back here!  I hope you enjoy them!!


***I am NOT LIABLE for any plans featured here. Please take every precaution and use your own discretion to make sure these toys are safe for children to play with them.

Wednesday, June 8, 2011

Where Have Ya Been, Reese???

I wanted to take a minute to tell everyone that I'm still here...
but I've had another death in the family....
my husband's dear grandmother.

We have been spending time with family,
moving belongings,
and generally just living in mourning.

My blog work has been on hold while we handle all of the details.

Please know that I will get back to building once my heart "is in the work",
but in the mean time I am spending some moments
just 
to
BREATHE.

See y'all soon....

Kristi

Thursday, May 26, 2011

Updated "Upcoming Projects" List

I have updated the "Upcoming Projects" list!

Check it out to see what is coming up next....

**"In design" means it is finally on paper.**
**"In production" means it is in "wood form" in my garage being worked on.**
**"Nearly finished" means it is the next thing you will likely see on the blog of finished projects!**

ENJOY!

:)