Monday, December 22, 2014

Getting Ready.....
Stay TOASTY warm, friends!

Boy and Girl doll clothes:
handmade by and purchased from
All Dolled Up Doll Clothes by Terrie

The Fireplace plans can be found here:
Fireplace

The Chair plans can be found here:
Upholstered Chair

Friday, December 12, 2014

STILL HERE!!

Thank you to all of our loyal blog readers 
who have sent messages over the last several months!
We are STILL HERE.
Our extended family has been going through 
some very difficult trials of late,
but...
we are still making fun things,
and I will be posting more of them 
in the future!!

We have added A LOT to the General Store:


See you again soon!

Wednesday, March 19, 2014

Pet Store

We've been silent for several months, but it was for a GOOD REASON!!
Besides adding to our General Store, 
we have been working on a PET STORE for the dolls…
 There is a section for fish/amphibians/reptiles: 
(Clear acrylic boxes were used for the 'cages'. 
Sand and rocks were glued inside to add decor, and 
printed pictures were decoupaged on the sides/back to add depth.
The "books", bags of gravel and plants, and the fish food were hand-made.)

 A section for horses:
(The feed bags and animal books were hand-made and other items were collected from local stores.)

And there's even an area dedicated to the local 4-H Youth 
to adopt their goats, rabbits, and chickens for their upcoming projects!

 The cash register area was made from a wooden stool 
with shelves added underneath, a bulletin board in front,  
and wooden signage overhead.
There's a place at the cash register for the birds to play!
 I will be adding more pictures that will include the 
DOG/CAT, BIRD, and SMALL ANIMAL areas.
We are still working on it every week, and will be adding things as time goes on.
If you have any questions, please leave it in the comment section!
Please feel free to use these plans to build furniture, for sale or for pleasure, but please do not sell the PLANS as your "own".  Please also give credit to me and link back here!  I hope you enjoy them!!
***I am NOT LIABLE for any plans featured here. Please take every precaution and use your own discretion to make sure these toys are safe for children to play with them.

Friday, October 4, 2013

Our New "General Store"

So....
We've been "silent" for several months,
BUT
we have been VERY busy.

We have made several new things.
One of those is our
GENERAL STORE:
All of the display shelves were made by me. You can find the tutorial for the white one here:
The doll pictured is a 23" My Twinn. We use him as an "adult" in our doll-world, as inspired by the AWESOME doll crafters at http://www.ourdolls.net
His very dapper attire was hand-sewn by my friend, Terrie, at http://www.alldolledup-dollclothes.com
 We made the pot-bellied stove (left) from a papier-mâché egg and some wooden plaques.
The (resin) wagon wheel is from Hobby Lobby.
We made the broom.

The jars are from Hobby Lobby, and their "contents" are all mini Christmas ornaments:
Candy canes, gingerbread cookies, peppermint sticks (we made these), chocolates, and candies.


The "cans" and "boxes" are made from wooden (round and square) dowels. 
 The baskets (various sizes) are from http://factorydirectcraft.com/index.php

The fruit and eggs were found at http://factorydirectcraft.com/index.php
(I painted the eggs.)
The potatoes and carrots are made from polymer clay and handcrafted by me.
The wooden "crates" are from Michaels.
 The money was printed from this website: http://www.printmini.com/printables/pp.html ,
and enlarged to be 1/3 scale.
We had fun one day and hand-dipped our own doll-sized candles!!
 The antique wall phone is also handmade by us. We used a 1"x 2" board, some string, polymer clay, 2 miniature wooden bowls, wire, and even a mini flower pot!
 We made our own seed box using a wooden "playing card" case, and then printed out labels and decoupaged them onto the box. We also made seeds by printing out the seed packets and glueing them to card stock. 

 The "flour bin" is a wooden box from Hobby Lobby that we painted and then added the custom label.

We made our "bolts of fabric" by covering a 7" piece of wood with fabric scraps.
We made some "wool blankets" for our store by folding 8x12 rectangles of felt!
I made the "yarn hanks" by hand-dyeing cotton kitchen string, and then twisting into hanks. 
A personal thanks to JeanieD for the inspiration!!
 "Cheese wheel" crafted from polymer clay.
 "Lye soap" crafted from polymer clay.
I hope that you have enjoyed the little "tour" through our General Store! 
We are still working on it every week, and will be adding things as time goes on.
If you have any questions, please leave it in the comment section!

Please feel free to use these plans to build furniture, for sale or for pleasure, but please do not sell the PLANS as your "own".  Please also give credit to me and link back here!  I hope you enjoy them!!
***I am NOT LIABLE for any plans featured here. Please take every precaution and use your own discretion to make sure these toys are safe for children to play with them.

Tuesday, July 9, 2013

18 inch Doll: Polymer Clay Beef Pot Roast OR Beef Stew

Today, we are going to make
BEEF POT ROAST 
(or BEEF STEW)
for the dolls!

YOU WILL NEED:
1 - 2 ounce package of BROWN polymer clay (meat)
1 - 2 ounce package of TRANSLUCENT polymer clay ("fat" in meat, onions)
small amount ORANGE clay (carrots)
small amount CELERY GREEN clay (celery)
1/4 package BEIGE clay (potatoes)
Translucent Liquid Sculpey (to make your "sauce")
Triple Thick (clear glaze to seal your finished food) AND dedicated paintbrush to apply
Pastel Chalks (for creating color in your "sauce") AND dedicated paintbrush to apply
Polyblade (for cutting your clay)
a clay "plastic roller" or a clay "pasta machine" (for rolling out your clay)
toothpicks & tinfoil OR plastic cups (for mixing TLS/chalk: these need to be disposable!)
tinfoil (AND / OR a dedicated glass baking dish)
a small ball of tin foil (for texturing)
clay extruder
oven
***I used an orange "pot" from Hobby Lobby (these are seasonal: they change colors, sizes and shapes depending on the holiday) for $4.99. I also found 2 small "bowls" at Hobby Lobby. (Similar items can be found at World Market.)

DIRECTIONS:

Meat:

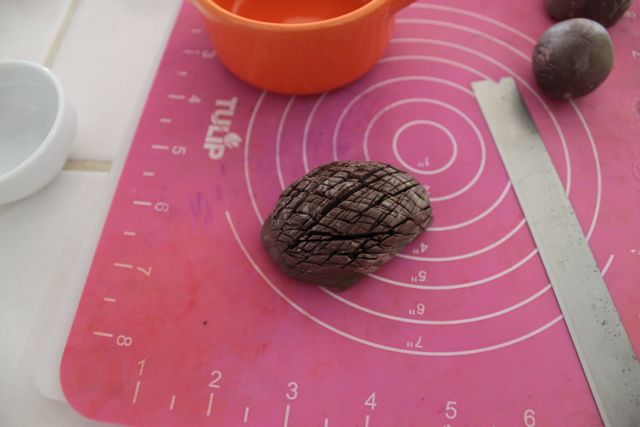
1.  Warm up ALL of your BROWN clay and about HALF of your translucent. Cut the translucent into large chunks, and add them to the outside of your brown clay. Roll through your pasta roller several times (folding over the clay onto itself as you go). When your translucent starts to make "veins" in the brown clay, begin working the rolled clay into a round ball:
2.  When the ball is ROLLED WELL: gently press it to flatten the bottom, while pinching the ends and top to make an OVAL:
 3.  Use your poly-blade knife to cut lines into the clay NEARLY to the bottom, and ALL THE WAY ACROSS. First from one direction:
 4.  Then from the other direction:
 5.  Then cut a few going from left to right:
6.  Place your "meat" into your dish (or onto a piece of tin foil for baking):
 7.  Use your poly-blade knife to carefully "cut away" (drag) at the "meat" until it appears FLAKEY:
 8.  You can REMOVE some of those pieces and add them to separate bowls (if you desire):
 9.  Larger pieces look more like POT ROAST, while smaller pieces resemble BEEF STEW.

VEGETABLES:
Carrots:

10.  Roll out a small amount of ORANGE clay. Once warm, roll into a ball and then into a snake. You can "par-bake" with a heat gun until "stiff" (the color will dull and not shine) so that it is easier to cut, but it is not necessary. Cut snake into either SLICES (stew) or SECTIONS (pot roast). Add Carrots to your desired dish.
Celery:
11.  I used celery colored (GREEN) clay, rolled out into a small snake, cut into sections just smaller than the length of a toothpick, flattened out a bit, and then "rolled" the clay lengthwise around the toothpick.  I then "baked" the clay-toothpicks under my heat gun just long enough to stiffen the clay (see carrots).  Once cooled, slide the toothpick out of the center, and then "slice" your celery into small pieces.  Set aside.
Potatoes:
12.  Roll out BEIGE clay (about .5 ounce) until warm.  Then roll clay flat on a pasta machine until it is about 1/4" thick.  Use a chalk brush and dark brown pastel chalk to lightly color the top of the clay (top only) so that it is the color of a potato skin.  Slice the clay into about 1/4"x1/4" slices.  Par-bake the pieces with a heat gun (see carrots) and set aside.
Onions:
13.  Roll out TRANSLUCENT clay (about .25 ounce). Once warm, roll into a small snake. Cut snake into approximately 4 small sections.  Flatten each section, and then "fold" each section lengthwise over a toothpick (see celery).  Use a heat gun to par-bake the clay (you will see the color change slightly), allow to cool, remove the toothpicks, and then slice them into "onion slices".  Set aside.
ASSEMBLING THE FINAL DISH:
14.  Add vegetables to the dish(es) as desired. (A toothpick is a good tool for moving "pesky" food pieces that don't "GO" where you first put them!)


 15.  Mix 1 OUNCE TLS with pastel chalks (dark yellow, dark brown, red-brown). (I used a small disposable cup and a toothpick, but tin foil works well, too.)
 16.  Keep adding chalk until the TLS has darkened (should look like "chocolate milk"). Hint: the TLS will darken EVEN MORE when it is baked, so don't go crazy trying to make it "perfect":
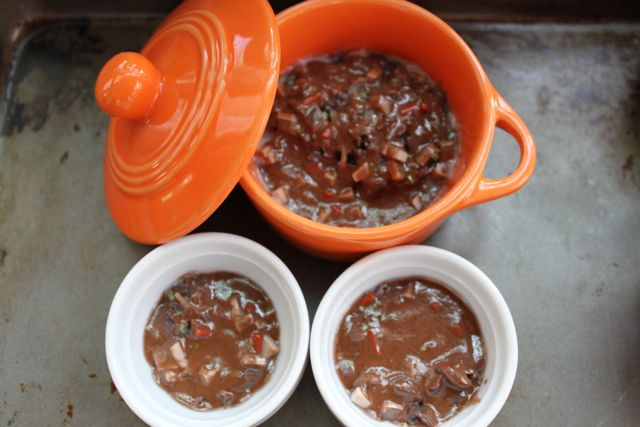
17.  Pour the colored TLS OVER the prepared "meat/vegetables". GO SLOW to make sure that you get all the "nooks and crannies" filled, while occasionally "tamping" the dish on a table to release trapped bubbles. You can add a few veggies right at the top for more depth and realism. I also sprinkle mine with crushed HERBS for a "spiced" look.
18.  Bake all pieces according to manufacturer directions on your clay package. Allow to cool.
19.  Glaze the top with Triple Thick, and allow to dry overnight.
 You are now ready for play!
 These are some "beef stew" that we made...just add MORE TLS, and MORE veggies at the top!
PLEASE REMIND YOUR CHILDREN THAT 
THIS "FOOD" IS FOR PLAY 
PURPOSES ONLY
AND SHOULD NEVER BE PLACED INTO THEIR 
MOUTHS!

Please feel free to use these plans to build furniture, for sale or for pleasure, but please do not sell the PLANS as your "own".  Please also give credit to me and link back here!  I hope you enjoy them!!
***I am NOT LIABLE for any plans featured here. Please take every precaution and use your own discretion to make sure these toys are safe for children to play with them.