Saturday, March 26, 2011

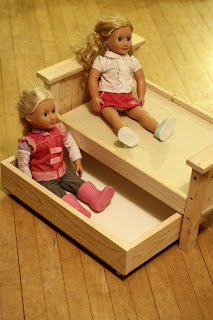
18" Doll: Modified Farmhouse Bed with Trundle

I'm still on my vacation, but for those of you who haven't seen this yet I just had to SHARE:


This is a reader submitted build to http://ana-white.com/ 
and the builder mamma_joy was nice enough to tell us how she did it so we can have one, too!!

Head on over and check it out!

Sunday, March 13, 2011

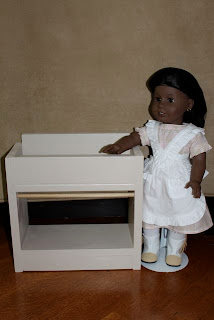
18" Doll: Dry Sink

Before I head off for my Spring Break....

I wanted to bring you one last plan!
I apologize for the "speedy" pictures...I was rushing to get this plan to you!

SHOPPING LIST: (You may have some of these pieces on-hand as SCRAP)

2 - 1x6@ 11.5" (for sides of the sink)
2 - 1x6@ 10.5" (for bottom shelf and bottom of sink basin)
1 - 1x3@ 10.5" (for front of sink basin)
1 - 1x4@ 10.5" (for backsplash of sink basin)
1 - 1x2@ 10.5" (for bottom front toe kick)
1 - 3/8" round dowel @ 12" (for hanging sink skirt ***if desired)
1 - scrap fabric @ roughly 6.5"high x 12"long (to make sink skirt curtain)

Air nailer / 1.5" Nails
Drill / small drill bit (to bore out 3/8" dowel hole) 
square
tape measure / pencil
small hand saw
120 Grit sand paper
wood putty to fill holes and knots
Paint or stain to finish your piece (if desired)

INSTRUCTIONS:

1.  Cut out all of your pieces of wood to the sizes specified in the shopping list.

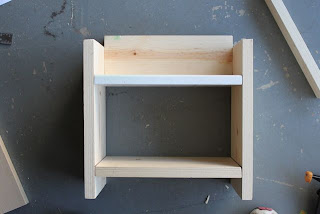
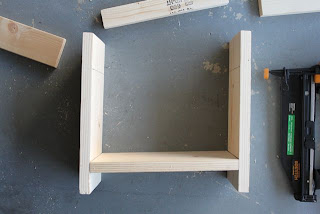
2.  Place your 1x3 on the side boards (as shown below) and mark where to nail.  Also place your sink bottom onto the board and mark, and your toe kick and bottom shelf and mark.  Use a straight edge to make sure that both sides of your sink are marked evenly so your shelves will be level:


3.  After marking, nail on your bottom shelf:

4.  Nail on your sink basin bottom (top shelf):

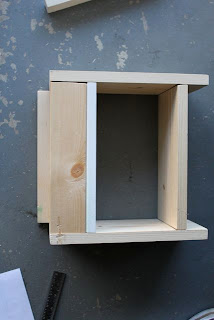
5.  Turn your sink onto it's face, and then nail on the 1x4 backsplash:

6.  Turn the sink back over to the front...

7.  And then nail on your 1x3 sink basin front:

8.  Nail on your 1x2 toe kick to the bottom front:

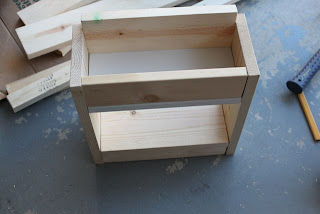
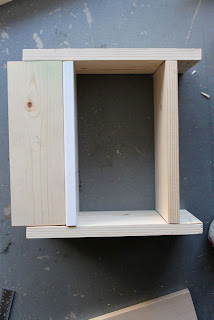
9.  Your sink should now look like this:

10.  If your sink will have a curtain, drill one hole on either side of the sink (1x6) 3.75" down from the top of the sink and about .5" in from the front of the sink.  Your dowel will then be passed through one hole, across the sink cupboard, and then rest in the other hole.

11.  Fill all holes with wood putty and let dry.  Sand well.  Finish with paint or stain as desired.

12.  Sew a small curtain to hang on the dowel, if desired.

13.  Your dry sink is now finished!
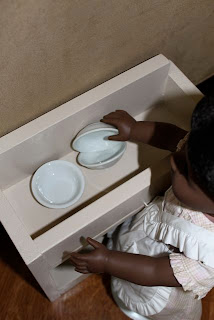
It's a great place to wash dishes...


Or maybe your doll has a "Pet Washing Service"??

Or how about an outdoor potting station for her greenhouse??

Or how about a place to develop all of Kit's photographs??


Please feel free to use these plans to build furniture, for sale or for pleasure, but please do not sell the PLANS as your "own".  Please also give credit to me and link back here!  I hope you enjoy them!!

***I am NOT LIABLE for any plans featured here. Please take every precaution and use your own discretion to make sure these toys are safe for children to play with them.
18" Doll: Food Ideas

In my last post I showed how to make "canned goods" for our grocery store shelves.

Yet....sometimes we need some things that look more like "food" and feel more "realistic".  You can purchase food direct from American Girl:

or from a store front on Etsy:
My favorite is PIPPALOO!

or you can find "doll food" at any number of online sellers:


I have found that in each of these cases I am limited to what items are available and what my budget allows...

So I decided to try to make my own selection of food and save money in the process by using an online series of tutorial videos.
Please visit:


She has some AMAZING tutorials on using polymer clay to make doll food.  I have used SEVERAL of these methods, and have made everything from cakes to vegetables to bread.

Polymer clay and the other tools used can be found at your local hobby/crafts store for reasonable prices, especially when they go on sale!  Then you have the ability to customize the size, shape, color and sheer number of items that you can make at one time.  Need a grocery store FULL of vegetables?  Need a bakery full of bread?  How about a pizzeria?  Just sit down and make a few items at time....easy peasy!

Saturday, March 12, 2011

18" Doll: Grocery Store or Bakery, Canned Goods

This is modeled after a plan on Ana's website, with some changes:

SHOPPING LIST: (You may have some of these pieces on-hand as SCRAP)

2 - 1x6@ 11.75" (for sides of grocery) **the sides will be sawed to an angle on one end**
2 - 1x6@ 10.5" (for shelves)
1 - 1x4@ 13" (For top of grocery)
2 - 1x2@10.5" (for bottom front and back toe kick)
1 - acrylic @ 6.5"x11.75" (for bottom front "glass" on grocery)
1 - acrylic @ 4.5"x11.75" (for top front "glass" on grocery)

Air nailer / 1.5" Nails
drill / 1" screws (for screwing on acrylic to front of grocery)
small drill bit to pre-drill screw holes
square
tape measure / pencil
small hand saw
120 Grit sand paper
wood putty to fill holes and knots
Paint or stain to finish your piece (if desired)

INSTRUCTIONS:

1.  Cut out all of your pieces of wood to the sizes specified in the shopping list.

2.  Mark your grocery SIDES where you want your shelves to be placed:
***my shelves are placed at 
                      Lower Shelf: .75" from bottom of grocery side to bottom of lower shelf
Middle Shelf:  6" from bottom of grocery side to bottom of middle shelf
(I then added the measurements of  the top shelf to the "top" of the grocery sides, and then drew a line from that measurement to the top of the middle shelf, creating the angle to cut.)


3.  Nail on your bottom and middle shelves.  

4.  Nail on your toe kicks to the front and back of your grocery.  (I nailed my 1x2 toe kicks on their sides instead of standing up as in other plans.)

This is what it looks like from the bottom:

5.  Nail on your top shelf, making sure that the shelf is centered on the grocery sides:

6.  Fill all nail holes with wood putty and let dry.

7.  Sand well.

8.  Paint or stain piece to your desired finish.

9.  Attach your 2 pieces of acrylic to your grocery using 1" screws.  (Be sure to pre-drill your holes through the acrylic and the wood!)

10.  You are now READY TO PLAY!!

Maybe it's a bakery....

Maybe it's a pizzeria...

Maybe it's an Ice Cream Shop...

And for your added enjoyment....

A CANNED GOODS TUTORIAL:

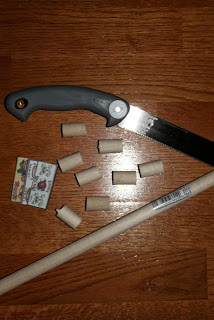
You need 8 pieces of .75" dowel cut to 1.25" long

Sand your pieces well...

Paint the ends with silver craft paint...

Go to Jim's Print Minis:
Print out this page at 150%.
Cut out images.
Decoupage images onto dowels, making sure to add decoupage on top of labels to protect them.
After they are dry, you have this:
Make as many as you need to fill your grocery shelves!! :)

Please feel free to use these plans to build furniture, for sale or for pleasure, but please do not sell the PLANS as your "own".  Please also give credit to me and link back here!  I hope you enjoy them!!

***I am NOT LIABLE for any plans featured here. Please take every precaution and use your own discretion to make sure these toys are safe for children to play with them.

Sunday, March 6, 2011

Reader Build

One of our reader's, Joanna, has submitted some pictures for your "inspiration"!

She made these items based on our tutorial here:


She KNITTED her very own bag!! (I wish that I could knit or crochet!!)


She then worked on her passport:


She made a bi-fold wallet - SO CUTE!!

And then she downloaded some ADORABLE pics of credit cards and gift cards, laminated them, and added them to the wallet:


Don't forget the money!


And for my FAVORITE addition....

She knitted a small "knitting bag" and a "knitting project" to go in it!! WOW!!


A BIG THANK YOU TO JOANNA FOR THE INSPIRATION!!!!! :)

The labels on the yarn are from Jim's Print Minis
**when you print them out, scale them up 150% to be AG doll size**

Please feel free to use these plans to build furniture, for sale or for pleasure, but please do not sell the PLANS as your "own".  Please also give credit to me and link back here!  I hope you enjoy them!!

***I am NOT LIABLE for any plans featured here. Please take every precaution and use your own discretion to make sure these toys are safe for children to play with them.
Reader's Build

Please direct your attention to fellow reader Emily @ domestic deadline:


She used the doll bunk bed plans to make an AWESOME prize for her babes!

Please check it out and let her know what you think! :)

Kristi


Please feel free to use these plans to build furniture, for sale or for pleasure, but please do not sell the PLANS as your "own".  Please also give credit to me and link back here!  I hope you enjoy them!!

***I am NOT LIABLE for any plans featured here. Please take every precaution and use your own discretion to make sure these toys are safe for children to play with them.

18" Doll: Backback with Doll Carrier

For those of you who have wanted a Doll Carrier (backpack) for your doll....

Noni has put together a sewing tutorial on her blog for you!


Please visit her and be sure to drop her a line of THANKS for this cute idea!

Kristi

Please feel free to use these plans to build furniture, for sale or for pleasure, but please do not sell the PLANS as your "own".  Please also give credit to me and link back here!  I hope you enjoy them!!

***I am NOT LIABLE for any plans featured here. Please take every precaution and use your own discretion to make sure these toys are safe for children to play with them.
Wednesday, March 2, 2011

18" Doll: Online Websites

For doll lovers out there:

FURNITURE:


CLOTHES:


http://www.alldolledup-dollclothes.com/

http://www.mypinkplanet.com/

http://www.necessaryextras.com/clothes/index.html

http://centralnjemilyroseathome.blogspot.com/

http://www.mygirlsdollboutique.com/?gclid=CJjPkNXcsKcCFQcnbAod2COQAg


http://www.debsdollboutique.com/?gclid=CJ_L4_XcsKcCFQpvbAodLGjD_w


http://www.dollcloset.com/fun_stuff.htm


http://www.dollyoutfitters.com/


http://american-girl-doll-clothes.com/doll-clothes/american-girl-doll-accessories

http://www.uniquedollclothing.com/


http://www.silly-monkey.com/


http://www.dollmarket.com/


http://www.meandmyprincess.com/


ACCESSORIES:

http://www.tlcdoll.com/textdoc/acc.html
(This is where I bought my miniature oil lamps!)

http://www.sew-dolling.com/

http://www.necessaryextras.com/clothes/index.html


(scroll down for AG size hat for Felicity)

(tea sets, instruments, sports)


DOLL BLOGS:


These are just a FEW of the sites I regularly visit.  I hope that this can help someone out there?? :)