
Today we are going to make an 1860's step-top cast iron stove for our dolls.
You can see some pictures of real stoves here:
(Ours is modeled after the 1860's stove seen at this site under the "more step-top stoves" section. I have made it just slightly larger than a scale reproduction so that items could be placed in the oven and on the stove top, and so that the firebox would fit an LED tea light.)
The original stove measures about 28" wide x 53" deep x 35" tall.
When converted from actual size (1:1) to doll scale (1:3) using:
the size translates to 9.3"wide x 17.6"deep x 11.6"tall.
OURS MEASURES: 12"wide x 16"deep x 15"tall (top of oven)
SHOPPING LIST: (You may have some of these pieces on-hand as SCRAP)
1 - 9x12 wood (for lowest part of stove - firebox) **I used a "plaque" with routed edges from Michael's
1 - 11x14 wood (for middle of stove - stove top) **I used a "plaque" with routed edges from Michael's
1 - 6.5"x9.5" wood (for top of oven box) **I used a "plaque" with routed edges from Hobby Lobby

2 - 1x2@ 6.25" (bottom frame)
2 - 1x2@ 10" (bottom frame)
2 - 1x2@ 2" (bottom frame - to attach the door stop "legs" to frame)
1 - 1x3@ 3.75" (left side of fire box)
1 - 1x3@ 9.5" (back of fire box)
1 - 1x2@ 2.5" (side door of fire box)
1 - 1x2@ 2.5" (front left of fire box)
1 - 1x3@ 2.25" (front right of fire box)
1 - MDF@ 2.25"x2.25" (side door to fire box)
1 - MDF@ 10"x2.25" (front fire grate for fire box)
2 - 3" door stops (front legs) **mine are from Lowe's

2 - 5/8" square dowel @ 8" (back legs)

2 pairs of small hinges (for fire box door and oven door)
2 - 1x2@ 7" (for sides of rear leg frame)
1 - 1x2@ 8.5" (for back of rear leg frame - attach legs to this piece)
2 - 1x6@ 9" (front and back of oven box)
1 - 1x6@ 4.25" (for side of oven box)
1 - MDF@ 4"wide x 5.25" high (for oven door)
1 - 3/4" size PVC pipe @ 11.5" (vertical stove pipe)
1 - 3/4" size PVC pipe 90* elbow (stove pipe return)
1 - 3/4" size PVC pipe @ 2" (stove pipe return to wall)
1 - LED tea light (for placing in fire box)
Optional - assorted decorative wood appliques (for front of oven box)
Optional - if you desire, you can spray paint your piece like I did using "flat black" spray paint
Drill / counter-sink bit / small drill bit for hinges / 1" hole bit (for stove pipe)
2" screws
1.25" screws
square
tape measure / pencil
level
wood glue
small hand saw
120 Grit sand paper
wood putty to fill holes and knots
Paint or stain to finish your piece (if desired)
****************************************
INSTRUCTIONS:
1. Cut out all of your pieces of wood to the sizes specified in the shopping list. Sand all cut ends smooth.
2. Attach your 1x2 (6.25" & 10") bottom frame pieces together, adding the 2" door stop pieces, as shown:


4. Screw the other 2.5" piece to the "front of the fire box, as shown:

5. Lay your fire box "frame" that you have now built onto your 9x12 wood, also placing the other 2.25" piece in the front (loose, not attached yet). Center your piece on the board so that it lays about 1.25" IN FROM THE BACK of the piece (as shown below), and draw lines with a pencil around the WHOLE frame onto the 9x12 board. This is how you will know where to drill pilot holes.

6. Now remove your firebox frame, and drill 3pilot holes across the back 9.5" section, as shown:


12. Remove the 2.25" piece. Drill 2 pilot holes through the top of the 9x12 board (between the lines you made).


14. Attach your bottom frame to the bottom side of your 9x12 board, drilling from the top of the board down into the frame (at the rear-center of the piece and then at the front-center):


16. Drill pilot holes down through the 11x13 piece into the firebox frame below, and then attach with 2" screws, making sure to OFF-SET your screws to "miss" the screws in the frame below, as shown:


18. Lay your oven box top (6x9 wood) over the frame you just built, centering the top on the frame, and then mark around the underside of the top with pencil. On the top center-back of your oven top, make a mark with your pencil around your PVC pipe (about 1.5" in from rear), as shown:


19. Use a 1" hole drill bit to drill out a hole for your PVC pipe:

20. Place your oven top (6x9) back onto your oven frame and drill down through the top into the frame, and then attach with 2" screws, as shown:

21. Turn the entire piece over onto its top, with the 11x13 facing toward you. Lay your 2 1x2 (7") pieces on either side (lined up with the sides of the fire box frame) so that it looks like this:

22. Mark around your 1x2 pieces with a pencil, as shown:

23. Remove your 1x2's (your piece should now look like the one below):

24. Drill 2 pilot holes in both sides, one at the middle and one towards the end closest to you:

25. Now hold the 1x2 up to the underside of the 11x13 board, making sure to line up the 1x2 with the pencil marks you made, and drill through your pilot holes you made into the 1x2. Attach with 2" screws:


27. Now with your piece facing "up" again, temporarily support the underside of it with some stacked scrap boards.
28. Place your pre-constructed oven box onto the 11x13 board, and once centered (about 1.5" in from rear), mark around the base with a pencil:

29. Remove the oven box from the 11x13. Your 11x13 should now look like this:

30. Now drill 5 pilot holes (1 @ center of end piece, 2 on each long side) through the 11x13 from the top between the lines you marked:

31. Turn your piece upside-down and place on top of your oven box, making sure to line up the oven box with the pencil marks on the 11x13. Hold firm once in place:


32. Drill pilot holes through the pilot holes that you made into the oven box below, and then attach with 2" screws:

33. Once flipped right side up, it should now look like this:

34. Turn your whole piece upside down. On the bottom frame, drill a pilot hole where the 2"block (1x2) meets the front corner of the frame. Repeat at other corner:

35. Now attach your front legs (door stops), 1 in each corner:

36. Your oven should now look like this:

37. Prop your piece up on scrap pieces of wood again. Place a level onto the front of the 11x13 board (your future stove top) so that it faces front to back:
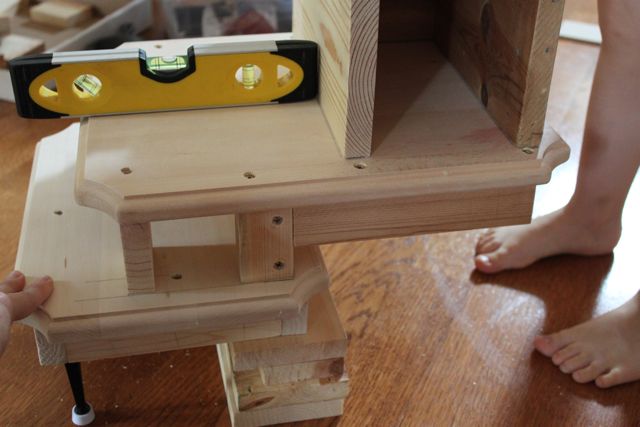
38. Now...while making sure that the piece stays level, measure from the inside back (underneath the 11x13) to the ground (mine measured 8"):

39. Attach your square dowel legs to your back leg 1x2 piece (8.5"), using a counter sink bit to drill pilot holes, and then 1.25" screws to attach the legs to the 1x2 piece:


40. Place the rear leg frame under your oven and then remove the scrap wood holding your oven up. Make sure that your oven is still reading "level".

41. Attach your rear leg to your oven using wood glue and clamps. Let dry overnight before removing clamps:

42. While your back leg is drying, you can take the opportunity to fill screw holes, cracks, knot holes and joints:


43. Allow your wood putty to dry overnight.
44. Remove your clamps from your rear leg.
45. Sand your oven really well, being sure to make all of your wood putty level:

46. If you have any decorative wood appliques, you can apply them now using wood glue and clamps. Allow the glue to dry overnight:

47. If you desire, you can draw a "grid" onto your fire box 2x10 piece, and then drill out the intersecting holes to make a design for your LED "fire" to shine through:


50. Attach your hinges to your doors, and then to your oven:


51. If you desire, you can attach a small wood block (oven) or a small screw (fire box) to the inside of the doors so that they don't swing in all the way and strip out the hinges:


For size comparison,
"My Twinn" doll (23") is featured at left
and an American Girl doll is featured at right:


Plans for the dry sink can be found here:

Plans for the hutch can be found here:


Slide the fire box grate out to access the LED tea light.


Chicken, anyone?

***Cast iron kettle: http://www.basspro.com/Lodge-Logic-CastIron-Country-Kettle/product/65325/
***Cast Iron Skillet: http://www.basspro.com/Bass-Pro-Shops-CastIron-Skillet-Spoon-Rest/Ash-Tray/product/21448/
***Cast Iron Deep Pan: http://www.walmart.com/ip/Paula-Deen-3-oz-Scented-Candle-Skillet-Blueberry-Pie/19887626 (This is a candle that I used and then melted the remaining wax out of it.)
***Ceramic Bowls in blue stripe: http://www.marshallpottery.com/catalog.htm
***Copper watering can: Michaels (floral department)
***Iron: American Girl (Kit's Washday Set)
***Lantern: found at Tuesday Morning (may have been an ornament?)
***White Mortar and Pestle: from World Market
***Green glass oil lamp: http://www.doll-hospital.com/textdoc/items.html
Please feel free to use these plans to build furniture, for sale or for pleasure, but please do not sell the PLANS as your "own". Please also give credit to me and link back here! I hope you enjoy them!!
***I am NOT LIABLE for any plans featured here. Please take every precaution and use your own discretion to make sure these toys are safe for children to play with them.