

SHOPPING LIST:
1 - Wooden Box (with drawer) (I purchased mine from Hobby Lobby #745984, $5.99)
***It is actually something they call a "doll dresser" and the mirror on top was removed.
***I have seen a similar wood box at Joann's: #602129648264, $2.99
4 - 7" Wood spindles for legs (or dowels of your choice)
***I used 8.5" spindles and cut off 1.5", purchased here: http://www.caseyswood.com/shoppingcart/zen-cart/index.php?main_page=product_info&cPath=47&products_id=397
1 - 1/8" thick round plywood circle @ approx. 1-7/8"x4-1/8" (drawer insert) & small scrap (for bag)
2 - 1/4" square wood dowel cut @ 3.5" (drawer face panel)
2 - 1/4" square wood dowel cut @ 4" (bag frame)
1 - 5" section of ribbon (drawer insert "pull")
muslin (bag interior lining) (see instructions for measurements)
Fabric of your choice (exterior bag fabric - I used silk) (see instructions for measurements)
Fabric of your choice (exterior bag fabric - I used silk) (see instructions for measurements)
flat blade screwdriver OR putty knife (for prying the dresser top loose)
T-square
measuring tape
pencil
Drill (for drilling out holes for spindles) ***or you may glue and clamp, but it's not as stable
wood glue
wood clamps
saw
X-acto knife or razor blade (for cutting through drawer bottom and plywood drawer insert)
sand paper
wood putty (if you need to fill any holes)
hot glue gun (drawer insert "pull")
paint or stain to finish
INSTRUCTIONS:
1. Cut out all of your pieces as described and sand them smooth.
2. If you are using the "doll dresser" from Hobby Lobby, you will need to gently pry off the mirror portion of the dresser using a flat blade screw driver or putty knife. BE CAREFUL.


3. Remove the drawer from the box, and turn the box UPSIDE DOWN:

4. GENTLY pry the "top" of the box off (side facing you) using your flat blade screwdriver or putty knife. BE CAREFUL. (I cracked mine because I was going too fast, so I will glue it later in the instructions.)

5. With the top removed and set aside, turn your drawer UPSIDE DOWN, and line up in front of the box. You will want to mark with a pencil and square just inside the drawer opening, and then transfer those markings over to the box. (Example: my drawer opening measures 1-3/8"x3-3/8".)

6. Once both pieces are marked, use a saw and X-acto knife to carefully cut away the bottom of the box and the drawer.

7. On the piece you cut away from the box bottom, gently snap off the front scroll moulding, as shown:

8. You may discard the box bottom piece, but save the scroll-work piece for a future step.
9. Your pieces should now look like this:

10. Gather your pieces together. You should have your box, drawer, scroll-work piece, 4 legs (not shown), drawer insert (not shown) and flat top. You may want to go ahead and stain ALL of your pieces now.

11. If your box top doesn't crack like mine (***), glue and clamp the box top to the top of your box now. (I actually turned mine over....notice that the bevel edge on the box top was glued on the box upside down in the first picture!)
***Since I cracked my box top, I made sure to use wood glue (wipe off excess!) and clamped until dry. I then sanded well to remove any trace of the previous crack.

12. To create the "apron-front" on your drawer, take your 2 pieces of 3.5" long (1/4") dowel and glue together, and then glue to scroll piece and drawer BOTTOM front edge. You will need to clamp them together for good adhesion, wipe off excess glue, let dry well, and then sand any raised edges.

13. If you are using SPINDLES or ROUND DOWELS for legs, you will need to flip your box over and drill 4 holes for your legs to fit into. I did not glue in my legs because they are snug in the holes. (If you are using SQUARE dowels, you can use wood glue and clamps to attach your dowels into the 4 corners of the box. Let dry and remove clamps.) Add whichever type of legs you choose.

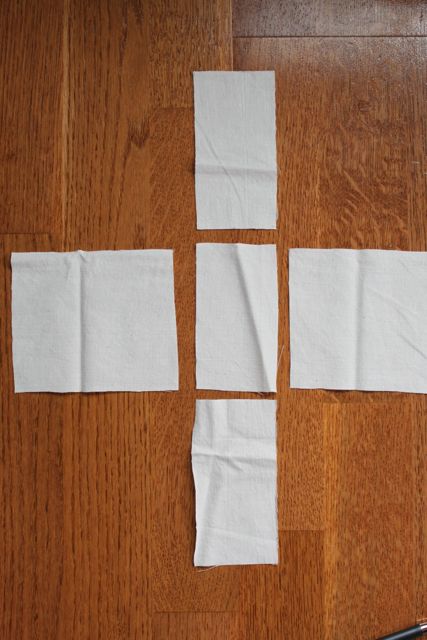
14. BAG: Begin by sewing your muslin liner first so that you get idea of size and construction. Cut out 2 pieces @ 4.25"x5" (front / back), 2 pieces @ 2.5"x5" (sides) and 1 piece @ 1.5"x3.25" (bottom). You will be using 1/2" seams.
15. Pin your bag right sides together, and then sew along seams leaving raw edges at top.

16. Try your bag in the hole of your drawer. Does it fit? (If not, adjust your seams and try fitting again.) Once your bag fits, you can use the above fabric measurements to cut out your OUTSIDE bag. The bags should now look like this: One muslin liner (inside out) and one outside "nice" bag.

17. Place a small piece of your 1/8" plywood (scrap) in the bottom of your "nice" bag for stiffness and support:

18. Insert your muslin bag (still turned right side IN) INTO your "nice" outside bag. (You should NOT see ANY seams inside the bags now...the seams should be facing each other between the 2 bags.) Turn down a small seam on each bag toward the inside and pin in place.


19. Sew around the top of the bag seam where you pinned to secure lining to outside of the bag.
20. Take your 2 pieces of 4" long 1/4" dowel and hot glue to either side of the bag:


21. Gently place bag into the drawer, running the bag through the hole and pulling out at the bottom. Allow the 1/4" dowels to act as a "frame" to hold the bag inside the drawer. (Adding a few scraps of fabric to the inside of the bag will help it to fill out nicely!)

22. Take your drawer insert (you should have already cut this out from your 1/8" plywood circle):

23. Cut a 5" piece of the ribbon of your choice:

24. Loop your ribbon, and then hot glue the ribbon ENDS to the BOTTOM of your drawer insert:

25. Place your insert into the bottom of your drawer! You can use the ribbon "pull" to remove the drawer insert to access the bag.


Please feel free to use these plans to build furniture, for sale or for pleasure, but please do not sell the PLANS as your "own". Please also give credit to me and link back here! I hope you enjoy them!!
***I am NOT LIABLE for any plans featured here. Please take every precaution and use your own discretion to make sure these toys are safe for children to play with them.