
She needed a BIG purse.....to carry all of her "stuff".
She needed a WALLET for her money....
oh...wait. She needs MONEY, too!!
Okay...maybe she needs a PASSPORT and CHECKBOOK, too!
*****DOLL PURSE*****

PURSE SHOPPING LIST:
felt or fabric in the following sizes:
2 @ 4.5"x4.5" (large sides)
2 @ 4.5"x2.25" (ends)
1 @ 4.5"x2.25" (bottom)
1 @ 1"x3" (button flap)
1 @ 3/4" button (for button flap closure)
2 @ 7" long cording (straps)
1 @ 1.5"x4" thin cardboard (inside bottom of purse for structure)*
*I got my thin cardboard from the back of a pad of paper.
PURSE INSTRUCTIONS:
1. Cut out all pieces of fabric (I used felt because that is what my daughter "picked out".), and lay them out to prepare for sewing.


3. Now sew on the other large side (4.5x4.5) to the other side of the bottom (4.5x2.25), right sides together.

4. Next, sew on your two long ends (4.5x2.25) to either side of the bottom, right sides together. You should now have a piece that looks like this:

5. Now sew up your long ends (4.5x2.25) to the sides (4.5x4.5), right sides together, creating a small "bag":

6. Your "bag" should look like this, with the sewn seems on the "outside" - this is the "wrong side" of the fabric, and will soon be the inside of your purse:

7. While you have your bag still turned inside-out, turn down the top edge and stitch along the edge, creating a nice hem:


8. Add a second row of stitches along the hem a little further over:

9. Now turn your bag "right side out", and insert the thin piece of cardboard into the bottom:

10. Sew your straps onto either side of the INSIDE of the purse, being sure to stitch WELL for stability:


11. Top-stitch around your button flap (1x3) to give it a "finished" look:

12. Sew your button flap onto your purse on the INSIDE between the straps:

13. Pinch your bag sides together at the top and pin. Sew on the inside through all thicknesses to create a "pleat" in the side of your bag:


14. Add any embellishments to the front and back of your bag. This could be ribbon, lace, rick-rack, leather trim, buckles, patches, rosettes, or anything else you can think of:

15. Hand sew your button to the front of your purse:

16. Bring your flap over and cut a small slit in the felt (this can ONLY be done with felt - other fabrics will fray unless you do a "button hole" stitch):

17. Your purse is FINISHED!

*****DOLL MONEY*****

DOLL MONEY INSTRUCTIONS:
1. Go to this website:
This nice man has gathered MANY mini-printables in Playscale (1:6) Barbie size. By simply scaling these up 150% before you print, many of these "Barbie" sized printables can now be 18" doll size!
2. Scroll down to the "Identification and Money" section, and select "Money: Modern US Bills".
3. Now you can click on each individual "bill type". Choose a #....maybe start at the $1 and work your way up.
4. Now you should have a WHOLE PAGE of the same "bills" displayed on your screen.
5. Select "FILE" on your computer.
6. Select "PRINT" on your computer.
7. Change the "scale" of your print from 100% to 150% (this makes it print out larger).
8. Select "PRINT". (You may want to change the # of pages that will print to just the first page so that you won't have lots of waste.)
9. Your money should look like this:

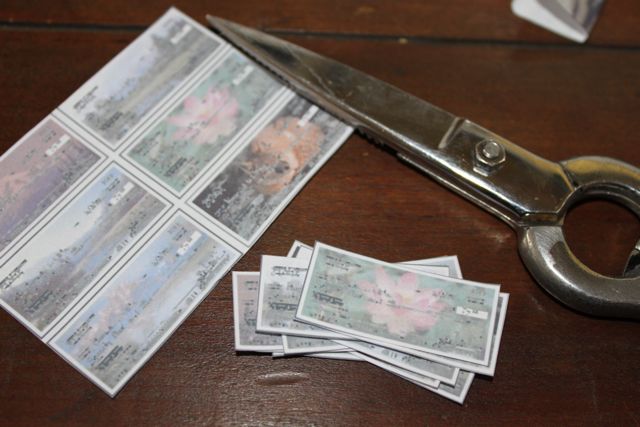
10. Cut out your money:


11. Fold your money along the edge:

12. Place double-stick tape on the inside of the money, and then stick the sides together:

13. You should now have a "bill"! Repeat this process with each bill until you have a WHOLE STACK of miniature doll money!
*****WALLET*****

WALLET SHOPPING LIST:
1 @ 2.5"x3" (felt)
1 @ 1/2" button
WALLET INSTRUCTIONS:
1. Cut out your piece of felt and get your button ready!

2. Place your money inside of the wallet, and fold up the front until it leaves your money "just peaking out", keeping right sides of fabric together:

3. Sew along the sides, creating a pocket, with the top flap still hanging out:

4. Turn the wallet right sides out, and cut the felt flap to a point:

5. Place your money inside to make sure it fits!

6. Hand sew your button to the front of your wallet:

7. Cut a small slit in your felt flap for the button to fit through:


8. Your wallet is now finished!

*****PASSPORT*****

PASSPORT INSTRUCTIONS:
1. Go to this website:
2. Scroll down to the "Identification and Money" section.
3. Select "Passports (no photo)".
4. You should now have a page that displays the passport front and the inside pages, with directions.
5. Select "FILE" on your computer.
6. Select "PRINT" on your computer.
7. Change the "scale" of your print from 100% to 150% (this makes it print out larger).
8. Select "PRINT".
9. Cut your passport front and pages from the printed paper. Fold your passport front and pages according to the directions. They should look like this:

10. Use double-stick tape to secure the inside pages to each other. They should look like this after taping when viewed from the top:

11. I used a large piece of clear packing tape to "laminate" the front of my passport. I simply placed the front of the passport face down onto the sticky side of the packing tape, and then gently folded in the edges:


12. Now use double-stick tape to secure the front and back cover to the inside pages:

13. Your PASSPORT is now finished!
*****CHECKBOOK*****

CHECKBOOK INSTRUCTIONS:
1. Go to this website:
2. Scroll down to the "Office Supplies" section.
3. Select "Check Supplies". Then select the type of checks you want (I used the nature photo checks). Now pick the type of checkbook cover you would like.
4. You should now have a page that displays the checkbook cover, banking paperwork, and checks.
5. Select "FILE" on your computer.
6. Select "PRINT" on your computer.
7. Change the "scale" of your print from 100% to 150% (this makes it print out larger).
8. Select "PRINT". (You may want to change the # of pages that will print to just the first page so that you won't have lots of waste.)
9. Cut out all of your pieces.
10. I "laminated" the front of my checkbook cover with clear packing tape (see the passport section for clear instructions on how to do this step):


11. I trimmed the edge of the tape with scissors.

12. I folded the checkbook cover carefully along the two lines at its spine:

13. Gather all of your "checks" together, making sure that the TOP EDGES are flush! I used a small paper clip to clamp the checks together FROM THE BOTTOM. You want to leave the top edge of the checks open because that is where you will be gluing!

13. Run a thin bead of regular white glue along the top edge of the stack of clamped checks. Let dry overnight. Check to see how well they are glued....mine required a second "minor" gluing at the edges and another night of drying.

14. Now you can open your checkbook cover and glue your stack of checks into the cover along the double fold at the checkbook cover spine:

15. Use a couple of paper clips to clamp the checkbook cover around the checks inside, being sure to clamp tightly along the cover spine:


16. Let this dry overnight..... and then unclamp! Your CHECKBOOK is finished!
NOW YOU CAN FILL YOUR PURSE WITH ALL OF YOUR DOLL ACCESSORIES!


Laptop Computer: http://www.printmini.com/printables/laptop/newtopp.shtml
Please feel free to use these plans to build furniture, for sale or for pleasure, but please do not sell the PLANS as your "own". Please also give credit to me and link back here! I hope you enjoy them!!
***I am NOT LIABLE for any plans featured here. Please take every precaution and use your own discretion to make sure these toys are safe for children to play with them.