I wanted to show you how easy it is to make
"food" for your dolls. All you need is a few standard
supplies, maybe a picture or two of the food you want to make,
and your imagination!
ICE CREAM:
Supplies:
*Toilet paper roll - I used 2, each cut into THIRDS (these make the "tubs" ice cream comes in)
*Clay - white (vanilla), brown (chocolate), other colors for "swirls" of your choice
*Clay Cutting knife - these are on the clay isle (or like a razor blade - BE CAREFUL!!)
*1/2 TSP measuring spoon (or a plastic disposable spoon) - this will need to be used for CLAY ONLY from now on...
*Tin Foil
*Pasta Roller - for rolling the clay flat to "blend" the colors (DO NOT USE for food again)
*Oven
*Baking dish (DO NOT USE for food again)
*Triple Thick - glue glaze for "finishing" your clay after it is fired
DIRECTIONS:
1. Clean your TP roll of all loose paper. Carefully mark your TP roll, and cut into THIRDS:
2. Choose the "flavor" of your ice cream: chocolate (brown) or vanilla (white), and then roll into a ball.3. Make sure that the ball can fit down into a single section of your TP roll, and then press down with your thumb:
4. Make sure that the ball now completely fills up the inside of the TP roll:
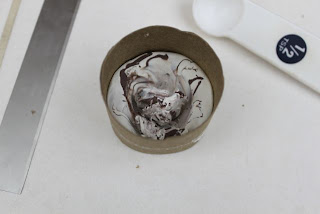
5. Use your 1/2 teaspoon (or plastic spoon) to carefully "scoop" at the ice cream, slowly creating a ball of ice cream in the center and forming "scoop" marks on the sides. I also use a toothpick or the end of my cutting blade to make the "texture" more rough:
6. Once you get a good ball of ice cream (and you are satisfied that it "looks real"), you can carefully take out the ice cream ball (to make a "scoop" of ice cream on the side) OR you can leave that "scoop" in the container like it's "ready" to be scooped out:
7. You should now use your flat blade to slide UNDER the whole ice cream container to separate it from your countertop CLEANLY, and then add it to your baking dish:
Bake in your oven according to your clay package directions! Once baked and then completely cooled, you can cover the entire piece in Triple Thick glaze to protect it and give it a "wet" look.
8. If you would like to make ice cream "flavors" like swirls and such, use your pasta roller to roll out your "flavor" of ice cream (here I used vanilla) and add pieces of your "swirl flavor" to the top (I used chocolate):
9. Roll through your pasta roller to make it flat, like this:
10. Fold it in half, like this:
11. Use your blade to cut it in half, like this:
12. Fold one of the pieces that you just cut over onto the other piece, like this:
13. Cut the clay in half again:
14. Fold over and stack again:
15. Smoosh the stack down with your hand:
16. **The more you cut, fold and stack the pieces, the smaller your swirls will be in your final ice cream, so keep going if you want a more SWIRLED look.
17. Roll your hand-smooshed stack through the pasta machine again:
18. Roll that long piece into a ball, like this:
19. Choose the side of the ball that you "like best" to face up in your TP roll, and add it to your "container":
20. Follow steps 1-7 to get the same product:
21. If you would like some ice cream "scoops" for a bowl, just place your rounded "scoop" that you dug out from your container onto your countertop. Use your fingers, a toothpick, and a cutting blade to make the scoop look more realistic. I "drag down" with my blade or a toothpick to give the edges a feathered look. You can also use a ball of tin foil for "texture".
22. Once you are satisfied with your "scoop", use your blade to slide under the scoop and transfer it to a piece of tin foil (or the bowl you intend to use) for baking:
Here's the finished product (clockwise from top left):
Vanilla Caramel (white with beige swirl)
Chocolate (brown)
Chocolate Candy Cane (brown with red, white & green swirl)
Rock-ee Road (brown with white swirl)
Chocolate Covered Strawberry (white with FINE brown & pink swirl)
Vanilla Fudge (white with brown swirl)
The plan for the "bakery case" can be found here:
Please feel free to use these plans to build furniture, for sale or for pleasure, but please do not sell the PLANS as your "own". Please also give credit to me and link back here! I hope you enjoy them!!
***I am NOT LIABLE for any plans featured here. Please take every precaution and use your own discretion to make sure these toys are safe for children to play with them.


No comments:
Post a Comment
Please leave a comment or a question - I don't bite and would love to write back, especially if you'd like help or have questions!!