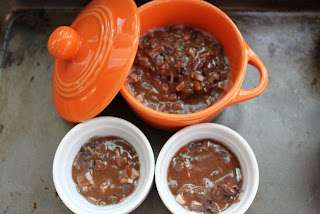
Today, we are going to make
BEEF POT ROAST
(or BEEF STEW)
for the dolls!
YOU WILL NEED:
1 - 2 ounce package of BROWN polymer clay (meat)
1 - 2 ounce package of TRANSLUCENT polymer clay ("fat" in meat, onions)
small amount ORANGE clay (carrots)
small amount CELERY GREEN clay (celery)
1/4 package BEIGE clay (potatoes)
Translucent Liquid Sculpey (to make your "sauce")
Triple Thick (clear glaze to seal your finished food) AND dedicated paintbrush to apply
Pastel Chalks (for creating color in your "sauce") AND dedicated paintbrush to apply
Polyblade (for cutting your clay)
a clay "plastic roller" or a clay "pasta machine" (for rolling out your clay)
toothpicks & tinfoil OR plastic cups (for mixing TLS/chalk: these need to be disposable!)
tinfoil (AND / OR a dedicated glass baking dish)
a small ball of tin foil (for texturing)
clay extruder
oven
***I used an orange "pot" from Hobby Lobby (these are seasonal: they change colors, sizes and shapes depending on the holiday) for $4.99. I also found 2 small "bowls" at Hobby Lobby. (Similar items can be found at World Market.)
DIRECTIONS:
Meat:
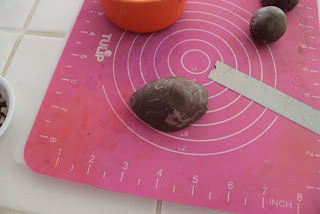
1. Warm up ALL of your BROWN clay and about HALF of your translucent. Cut the translucent into large chunks, and add them to the outside of your brown clay. Roll through your pasta roller several times (folding over the clay onto itself as you go). When your translucent starts to make "veins" in the brown clay, begin working the rolled clay into a round ball:
2. When the ball is ROLLED WELL: gently press it to flatten the bottom, while pinching the ends and top to make an OVAL:
3. Use your poly-blade knife to cut lines into the clay NEARLY to the bottom, and ALL THE WAY ACROSS. First from one direction:4. Then from the other direction:
5. Then cut a few going from left to right:
6. Place your "meat" into your dish (or onto a piece of tin foil for baking):
7. Use your poly-blade knife to carefully "cut away" (drag) at the "meat" until it appears FLAKEY:8. You can REMOVE some of those pieces and add them to separate bowls (if you desire):
9. Larger pieces look more like POT ROAST, while smaller pieces resemble BEEF STEW.
VEGETABLES:
Carrots:
10. Roll out a small amount of ORANGE clay. Once warm, roll into a ball and then into a snake. You can "par-bake" with a heat gun until "stiff" (the color will dull and not shine) so that it is easier to cut, but it is not necessary. Cut snake into either SLICES (stew) or SECTIONS (pot roast). Add Carrots to your desired dish.
Celery:
11. I used celery colored (GREEN) clay, rolled out into a small snake, cut into sections just smaller than the length of a toothpick, flattened out a bit, and then "rolled" the clay lengthwise around the toothpick. I then "baked" the clay-toothpicks under my heat gun just long enough to stiffen the clay (see carrots). Once cooled, slide the toothpick out of the center, and then "slice" your celery into small pieces. Set aside.
Potatoes:
12. Roll out BEIGE clay (about .5 ounce) until warm. Then roll clay flat on a pasta machine until it is about 1/4" thick. Use a chalk brush and dark brown pastel chalk to lightly color the top of the clay (top only) so that it is the color of a potato skin. Slice the clay into about 1/4"x1/4" slices. Par-bake the pieces with a heat gun (see carrots) and set aside.
Onions:
13. Roll out TRANSLUCENT clay (about .25 ounce). Once warm, roll into a small snake. Cut snake into approximately 4 small sections. Flatten each section, and then "fold" each section lengthwise over a toothpick (see celery). Use a heat gun to par-bake the clay (you will see the color change slightly), allow to cool, remove the toothpicks, and then slice them into "onion slices". Set aside.
ASSEMBLING THE FINAL DISH:
14. Add vegetables to the dish(es) as desired. (A toothpick is a good tool for moving "pesky" food pieces that don't "GO" where you first put them!)
15. Mix 1 OUNCE TLS with pastel chalks (dark yellow, dark brown, red-brown). (I used a small disposable cup and a toothpick, but tin foil works well, too.)
16. Keep adding chalk until the TLS has darkened (should look like "chocolate milk"). Hint: the TLS will darken EVEN MORE when it is baked, so don't go crazy trying to make it "perfect":
17. Pour the colored TLS OVER the prepared "meat/vegetables". GO SLOW to make sure that you get all the "nooks and crannies" filled, while occasionally "tamping" the dish on a table to release trapped bubbles. You can add a few veggies right at the top for more depth and realism. I also sprinkle mine with crushed HERBS for a "spiced" look.
18. Bake all pieces according to manufacturer directions on your clay package. Allow to cool.
19. Glaze the top with Triple Thick, and allow to dry overnight.
You are now ready for play!
These are some "beef stew" that we made...just add MORE TLS, and MORE veggies at the top!
PLEASE REMIND YOUR CHILDREN THAT
THIS "FOOD" IS FOR PLAY
PURPOSES ONLY,
AND SHOULD NEVER BE PLACED INTO THEIR
MOUTHS!
Please feel free to use these plans to build furniture, for sale or for pleasure, but please do not sell the PLANS as your "own". Please also give credit to me and link back here! I hope you enjoy them!!
***I am NOT LIABLE for any plans featured here. Please take every precaution and use your own discretion to make sure these toys are safe for children to play with them.


pls can you make a doll shoping cart
ReplyDeleteI will have to brainstorm on that one! Hmmm...
DeleteOk I had to look twice and rejog my memory this is Not real stew! Fab job! I just discovered your blog and its full of great projects. Please check out my blog I have alot of cool projects for 18in dolls !
ReplyDeleteThank you! Will do… :))
DeleteWow this is awesome
ReplyDeleteThank you!
DeleteLove your doll food!!! So inspiring! Thanks for sharing!
ReplyDeleteThank you!! I'm glad that you are enjoying the blog!
Delete