How about a dining table?
SHOPPING LIST:
1 - 1x12 @ 16" (table top)***(I used a router on mine to give it a nice edge, but you don't have to...)
4 - 1" square dowels cut at 8" long (legs)
1 - 48" long 1/2" square dowel (under top stiles)***(you will cut this to fit into the area between your legs)
T-square
measuring tape
pencil
Drill / countersink bit
2" screws
wood glue
wood clamps
saw
sand paper
wood putty
paint or stain to finish
INSTRUCTIONS:
1. On the underside of your 1x12"x16" board (after you use a router on the edges if thats what you desire), measure in 1" on ALL 4 SIDES, and mark with a pencil and your t-square:
2. Place one of your 1" dowel legs into each "corner" and mark off the 2 inside edges, creating a penciled "square" in each corner:
3. Using your square (or a ruler), draw intersecting lines from corner to corner of the "leg square" you just made in each corner of the table. We are finding the "center" of each square. Mark that center with a "dot":
4. In the center of that "dot", drill a hole through the table and out of the top, in each of the 4 corners:
5. Flip your table top over, right side up. Drill down through each of the 4 holes with a countersink bit, creating a place for your screw head to sit flush with the table top:
6. Turn your table top onto its side, placing one leg on the underside (centered in that "square" you made in the corner), and then pre-drill through your table top into your leg. This marks where the leg will be positioned to that table top hole:
7. Switch to your screw bit, and use a 2" screw to drill down through the table top into the leg, securing the leg to the top. Repeat with all 4 legs.
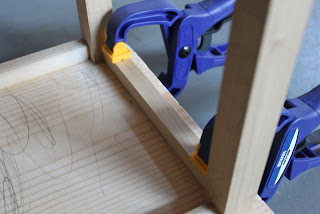
8. Measure the distance between each of your legs, one at a time. Cut a piece of your 1/2" square dowel to fit that measurement. Sand the ends. Check for fit between the legs. When satisfied with the fit, add a small amount of glue to the bottom and ends of the dowel, and then press into place between the legs. Secure with wood clamps, and allow glue to dry overnight:
9. Repeat with 3 other legs:
10. Fill all holes and cracks with wood putty, and allow to dry. Sand your table well. Finish with paint or stain and allow to dry. Enjoy!
Please feel free to use these plans to build furniture, for sale or for pleasure, but please do not sell the PLANS as your "own". Please also give credit to me and link back here! I hope you enjoy them!!
***I am NOT LIABLE for any plans featured here. Please take every precaution and use your own discretion to make sure these toys are safe for children to play with them.


I am amazed at how intricate the food is and how nice the furniture turned out. DO NOT GET ME WRONG! I am not surprised because YOU did it. I'm surprised because it is AMAZING!!! You did an awesome job!
ReplyDelete~ Stacey
Stacey -
ReplyDeleteThank you for checking out the blog! I can't knit or crochet, so I remain EVER SO IMPRESSED by all of your creations!!!! :) Thanks for the encouragement of positive words....I live on those!! xo
Kristi