FINALLY!!
We have a fireplace!!!!
I've been working on this since Thanksgiving...
It has been "built" since December,
"painted" since mid-January,
and completely "done" since last week! YIKES!
Admittedly....the holidays, family, travel,
and (of course) being pregnant were more of a "priority" than playing!
Okay.....I admit it....I've been "working" on some other projects, too...
we will see those later. :)
This is meant to be a "simple" fireplace that can be adapted to many different styles of doll play. I have attached some finish ideas at the bottom of the project. By simply changing some of the finishes, you can have a completely DIFFERENT look!!
I will be adding some fun fireplace accessory ideas in another post....don't fret! :)
SHOPPING LIST:
1 - 1x6 @ 24" (hearth-bottom)
1 - 1x6 @ 22" (fireplace mantel face)
1 - 1x4 @ 24" (fireplace mantel top)
2 - 1x3 @ 11.5" (fireplace vertical surround face)
2 - 2x2 @ 17" (fireplace vertical surround back)
2 - 1x2 @ 17" (fireplace vertical surround)
1 - 1/4" MDF @ 18.5"x 21.5" (fireplace backing)
about 30" (linear) of decorative quarter round (nailed under 1x4 mantel)***OPTIONAL
about 8" (linear) of square dowel (same size as quarter round)***OPTIONAL
T-square
measuring tape
pencil
Drill / countersink bit
2" screws
wood glue
wood clamps
saw
sand paper
wood putty
painter's tape
paint or stain to finish (I used white paint for the mantel, black for the MDF backing, and "stone look" spray paint for the hearth)
INSTRUCTIONS:
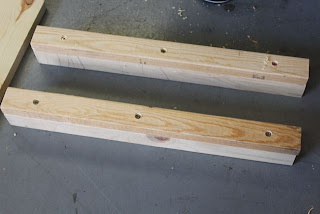
3. Now turn the 17" pieces (that you just screwed together) onto their sides, so that the 1x2 is facing outward. (The 1x4 mantel is shown on the left of the picture, and the 1x6 hearth is at the right of the picture. The fireplace is on it's "back".)
4. Now lay your 1x6 mantel face onto the 17" pieces, snugging them to each end of the 1x6, and making sure that your 1x6 is flush on the 17" tops and sides. Screw the 1x6 into the 17" pieces, as shown:
5. Now lay your 1x3 over the remaining "visible" portion of your 17" piece, and screw into place, as shown:
6. Repeat step 5 for the other side:
7. Center your hearth on the bottom (at right), making sure that you have the same amount of overlap on each end (approximately 1"). Screw into the 17" pieces from the bottom:
This is the view from the bottom:
8. Stand your fireplace up, onto the 1x6 hearth (base):
9. Lay your 1x4 mantel piece onto the top, making sure to center it from end to end (about 1" overlap each side), and making it flush to the BACK of the fireplace. Screw on:
10. Then...lay your fireplace back down onto it's back.
11. Measure your molding (for under the mantel) by laying it first at each side (making sure that it is flush on the front side), screwing or nailing into the fireplace, and then sawing off flush on the backside. Repeat on other side under mantel:
(I used square dowel on the sides of my fireplace because I didn't have enough quarter round on-hand.)
12. Lay your mantel onto it's back. Lay your quarter round onto the mantel face and under the mantel top. Make sure that one end is flush (as described above), nail or screw onto the mantel face, and then cut your other end off flush with that end. This keeps you from having to do a miter-edge.
13. Fill all holes and cracks with wood putty. Let dry. Sand well. Finish as desired. (Finish your MDF backing as desired, and then once entire piece is dry, nail onto back.)
FINISH IDEAS:
*This fireplace can be made "modern" or "simple" by simply painting it white as I did.
*You could add "real" mosaic tiles to the hearth and vertical face for a "European" look.
*There are small "pebbles" that can be purchased in a "tile sheet" at the hardware store...add those and some grout for an "old-world", "cabin", or "pioneer" feel.
*You could also "decoupage" a "brick-print" scrapbook paper onto the face, hearth, and MDF backing, and then stain the mantel a dark wood color: instant "colonial"!
*For those who are REALLY creative and who work with foam core, a simple box can be made and "inserted" into the current opening so that it mimics MODERN fireplace inserts placed into "old" fireplaces!
Here is the fireplace pictured with a 23" My Twinn and an 18" American Girl:
Please feel free to use these plans to build furniture, for sale or for pleasure, but please do not sell the PLANS as your "own". Please also give credit to me and link back here! I hope you enjoy them!!
***I am NOT LIABLE for any plans featured here. Please take every precaution and use your own discretion to make sure these toys are safe for children to play with them.


Awesome blog! Re-posted on my FB fan page @ https://www.facebook.com/collegesavingsdolls
ReplyDeleteHope your get more followers!
Sarah
Sarah:
DeleteThank you so much for the kind comment, and for linking to me! I hope that I am able to inspire someone out there to make fun things for their dolls!
Kristi