My 18" Doll Dining Room Hutch is finally built (but not finished)! In my effort to get this plan out to you before Christmas, I have simply built it and not filled holes, sanded, or finished the hutch. Please excuse the mess!
SHOPPING LIST: (You may have some of these pieces on-hand as SCRAP)
1x6: 2 @ 18" long (for sides)
1x6: 3 @ 12" long (for shelves: bottom shelf, 2nd shelf, 3rd shelf)
1x3: 1 @ 12" long (for 4th shelf)
1x4: 1 @ 14.5" long (for the top)
MDF: 13.5"x17.5" (for the back)
t-square level
tape measure
small hand saw
2" nails (nailing piece together except for back)
1" nails (nailing on the MDF back)
wood putty to fill holes and knots
Paint or stain to finish your piece
INSTRUCTIONS:
1. Mark your sizes on your wood and cut out your pieces. (I always mark the wood with sizes AND where it is to be used (leg, side) so that I can move faster when building.
2. Sand your pieces (on the ends to be joined, at least, if not completely). You don't want to deal with edges that won't join cleanly and snugly.
3. Lay your two pieces of 1x6x18" flat and flush next to each other. Using your shelves as a "thickness guide", mark the following measurements onto the side pieces:
Bottom shelf: 1" from bottom of piece to bottom of Bottom shelf
2nd Shelf (from bottom): 6.5" from bottom of piece to bottom of 2nd shelf
3rd Shelf: 10" from bottom of piece to bottom of 3rd shelf.
4th Shelf: 14" from the bottom of piece to bottom of 4th shelf
Then place your 4th shelf (1x3) onto each side piece so that it stands perpendicular to the side piece and is flush with the "back" of the side piece....mark where the front of the 1x3 comes to on the side piece (it's obviously not as wide as a 1x6). Now draw a line using a t-quare or ruler from the bottom outer point of the 1x3 shelf to the top outer point of the 3rd (1x6) shelf. This line will be a "triangle". (see picture below.) Also draw a line from the outer 1x3 point straight up to the top of the side piece. The excess (pictured below as "scribbled out" in pencil) will now need to be cut away using a small hand saw:
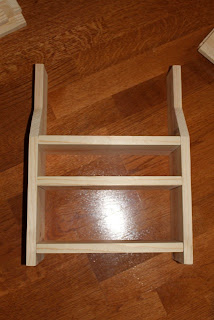
4. Now with your side pieces lined up again back-to-back, you should have even markings where your shelves will be placed:
5. First nail on your 2nd Shelf (1x6) into the middle of the piece, forming an "H"- this will help for stability as you go along. Make sure to line up each shelf with the "top and bottom shelf markings" that you made on the sides:
6. Next, nail on your 3rd Shelf (1x6):
7. Now nail on your bottom shelf:
8. Then nail on your 4th Shelf (1x3):
9. Stand your piece up. Lay the top piece on, making sure to center it well. Nail down through the top into the sides (sorry for the sideways pic):
10. Finally, nail your MDF back onto the back of the hutch using 1" nails.
11. Fill all nail holes and knots in wood with wood putty.
12. Sand piece well.
13. Finish as desired with paint or stain.
(I have not filled my nail/screw holes or painted this piece yet....in an effort to get the plans out to you so that you may build this in time for Christmas! Please forgive the lack of "finish"!)
Please feel free to use these plans to build furniture, for sale or for pleasure, but please do not sell the PLANS as your "own". Please also give credit to me and link back here! I hope you enjoy them!!
(The baking set, chef's coat and hat are from Target: Our Generation)


Hey Kristi!
ReplyDeleteYour blog is absolutely fabulous and I found you through Ana White! I can't see a way to contact you so can you shoot me an email..I have a question! ucreatecrafts at gmail dot com
THANKS so much!
Kari - sending you an email! Thanks for the KIND WORDS! :) Kristi
ReplyDeleteit is beautiful, your blog is amazing.
ReplyDeleteall your furniture are perfect. Thanks for putting the plan for it, even before you finish it.
I will be making some for Christmas.
I am one of many new followers (to come)!
Morgans - thanks so much for the kind words! I hope that you enjoy building some of these fun projects, and be sure to stay tuned to the blog for future ideas to come!! Enjoy! Kristi
ReplyDeleteWe are really struggling with getting the shelves attached flush and level. What are we doing wrong???
ReplyDeleteTwenty Dollar Home School: did you make the marks on your side boards? Re-measure to make sure they are all at the same distance. Another thing to check would be the measured length on your shelf boards. If they are slightly off, or your boards are slightly warped, it can make it off level. You can also sand down any board ends before you attach them....this might help if there are little splinters getting in the way of it being square. I hope this helps...PLEASE send me any questions you still have! :) Kristi
ReplyDeleteI finally took pictures of the hutch I made following your plans. It turned out really good.
ReplyDeleteIf you would like to see it, here is the link:
http://beardollyandmoi.blogspot.com/2012/04/doll-hutch-cupcake-display.html
thanks again!
Morgane:
DeleteI'm so glad that you built this hutch! I saw your pictures and it turned out just LOVELY! I adore the bead board backing! Thanks for the link-up...
:) Kristi